|
 |
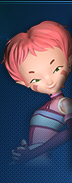
Yumi Cosplay [Lyoko - Season 4]
| | | Create your own cosplay... Yumi!
Here, discover the different steps to create a cosplay of season 4 Yumi by its creator, a member of the Group Cosplay project for the 2013 Japan Expo.
Here is a look into this meticulous work. It should be able to help you if you also one day wish to create your own cosplay! | | |
| | | I received a request to explain just how I went about doing this cosplay, and anything like it, so that it could be shared with anyone interested. Here is my costume design:
1) The suit
Yumi's suit is made up of several parts: a leotard, a glove, and leggings. The fabric used was Lycra (pink) and jersey (purple), these two fabrics cans stretch. I think it would have been better to only use Lycra but I didn't manage to find the right colour in this material for the purple part.
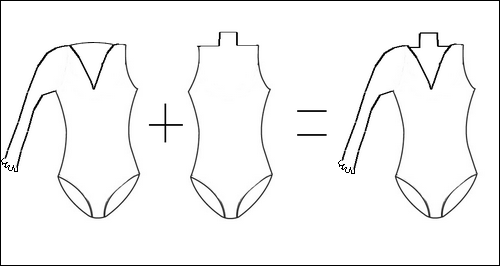
The leotard:
My leotard is actually made up of two leotards sewn together: a V-neck leotard with a sleeve and a sleeveless high-necked leotard, as shown in the following diagram:
It's possible to do it in just one piece: as for me, my jersey was slightly transparent when it was stretched, and two layers allowed me to have something more opaque.
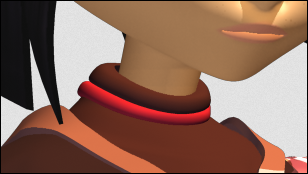
The high collar:
The collar lining was done with the help of two small plastic pipes slipped into cuts in the fabric.
For the purple ring: the ring is made from the collar meeting itself higher up.
For the pink ring: it's a tube of pink Lycra, sewn to the collar.
The plastic tubing is open at the back so that the leotard can be put on and the two collar rings are closed at the back with snaps.
The V-neck collar:
To make the pink V-neck more rigid, I used a very supple plastic something which was slipped into a band of light pink Lycra.
The glove:
Go see Elirna's explanation about Aelita's ^_-
The leggings:
My leggings are very far from perfect, notably around the crotch area (phew, that's the part hidden by the leotard :-° ), I point out to you nonetheless how I did it: I wrapped the Lycra and the ejrsey around my legs, I pinned it, I extended to my hips, I attached it basically at the crotch, and sewed.
2) Relief pieces/armour
(I don't know what to call it exactly)
Before everything else, I'm leaving you links to general tutorials that were very useful for me in this stage:
Working with mats and other foam
Costume player #18: tutorial on armour (completing the tutorial here was very useful for everything to do with attaching foam pieces, be it to one another or onto fabric)
The grey part of the bust:
The grey part of the bust is made up of several elements cut from foam mats. I rolled/folded (and glued) foam all over these elements to end up with rounded edges, then the different elements were assembled and glued together.
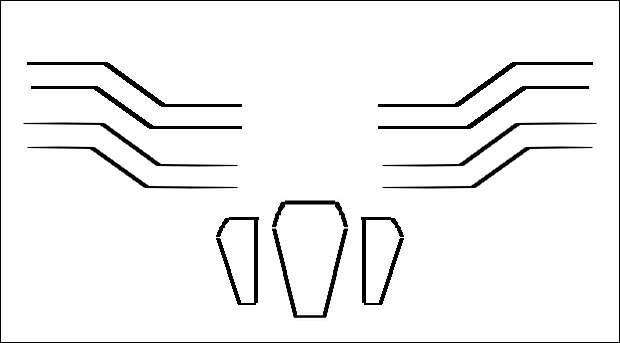
Diagram of the different elements:
This is a really rough diagram: the angles and proportions aren't right! It's just to show the different elements separate from one another.
On the back, the grey tubes don't join up but are connected by an elastic hidden by the yellow obi, allowing the grey part to be put on easily.
It's attached to the leotard with little skirt hooks.
The grey wrist piece/the round leg parts/the knee pads/the shoulder pads:
see the tutorials in the intro of this part
For the shoulder and knee pads, the pink "elastics" holding them on are stupidly bands of pink Lycra (the same as the leggings/shoes/collar/central band) sewn into a tube shape. The white decorations (flowers and circles) were cut from white foam then hot glued over the painted armour (gluing is much more solid when done before painting, but as these were not gluing areas that would be torn, I found it more simple to do it thus).
The grey things on the face:
They're once again sheets of folded foam.
Just before wearing the costume, I glue them to invisible dressings of the same height as the grey things, then I glue the dressing to me (another possible solution: Spirit Gum).
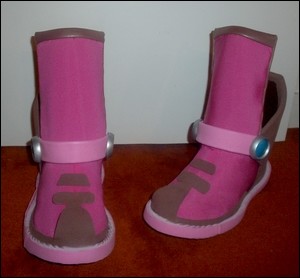
3) The shoes
To do them, I took old sports shoes that I covered in pink Lycra: I wrapped the Lycra all around the shoe then I sewed the shape. Then, it was glued to the top and bottom of the shoe.
The brown parts were cut from foam then glued to the Lycra.
The sides of the soles of the shoes were done with a strip of foam (for thickness), recovered in light pink foam (for colour - possibility of painting it instead).
The back of the shoe:
I did the visible part in foam and glued it to the back of the shoe. The whole thing was then covered in brown foam.
The shoe tongue:
Like for the exterior border, the thickness of the tongue was obtained with foam.
To give it shape, I cut a plastic bottle into a "curved rectangle". Then, I glued the foam around the plastic, which keeps it in the right shape (you can also use the tutorials from part 2).
The structure of foam + bottle was covered in pink Lycra first and brown foam second. The tongue is sewn to the shoe.
It follows the movement of the leg thanks to a thin strip wound around it that attaches to the interior of the tongue.
Pink strap and blue circles:
The light pink strap was done with a rectangle of foam, bent in on itself (always to get around edges). The top of the strap was glued to the bottom of the tongue, which also hid the seam between the tongue and the shoe.
For the grey and blue circles, I found mini plastic lids in the right shape that I painted.
4) The fans
I had 2 plastic fans. I detached the fan material from the base. I painted the prongs with acrylic paint after sanding them (so that the paint stuck to the plastic).
I took white fabric and I painted it using watercolour (damp cloth and very diluted paint) to make it pink and light yellow. Once dry, I added the little flowers with paint. I cut the fabric into the shape of the fan material then noted the placement of the prongs on paper with a pencil, which I then glued on.
___
For the assembly of the costume, unless otherwise specified, the glue used was neoprene adhesive gel. | | |
|
 |